

Voiceovers
Add narration to any video by uploading an audio file, recording one yourself, or generating one with AI text-to-speech. This article covers all three, plus how to manage voiceover clips on your timeline.
In this article
- The voiceover timeline
- Upload your own voiceover
- Record a voiceover
- Manage voiceover clips
- AI text-to-speech voiceovers
The voiceover timeline
Your project timeline has two audio layers: one for music and one for voiceovers. Click the microphone icon in the timeline (or Voice-over in the content bar) to open the voiceover panel. The voiceover layer holds multiple clips, and you can use it for any audio — narration, sound effects, or extra tracks.
Upload your own voiceover
Uploading works on every plan.
- Open the voiceover panel and switch to the Uploads tab.
- Click Upload media and pick an audio file (MP3, MP4, WAV, or M4A). To reuse a file you've uploaded before, click the + next to it instead. The track shows Included with a checkmark once it's on your timeline.
Voiceover audio uploads go directly into your project's timeline — they can't be stored in the Asset Library.
Record a voiceover
Biteable doesn't have a built-in audio recorder in the editor, but any of these work:
- A web recorder: record straight from your browser with Biteable's free Audio Recorder, then download the file and upload it to your voiceover timeline.
- Your phone: record with a voice memo app (like Voice Memos on iPhone) and upload the file.
- Biteable's Record tools: record a video, then pull the audio out with the audio extraction tool and upload the MP3. This also works for videos you receive through Record Requests — download the video from your assets, extract the audio, and upload it to the voiceover track.
Manage voiceover clips
- Volume and fades: click a voiceover clip in the timeline to open its properties, then use the volume slider and fade in/out controls.
- Trim: drag the handles at the start and end of the clip.
- Replace an uploaded voiceover: select the clip and click Replace. The Uploads tab opens — click the replace icon next to the track you want, or Upload media for a new file. (Replacing an AI text-to-speech voiceover works differently — see Replace or update an AI voiceover below.)
- Multiple voiceovers: just keep adding clips — the voiceover layer supports as many as you need.
Pin or unpin a voiceover to a scene
Voiceovers are automatically pinned to the scene you add them to, so they move and adjust with that scene.
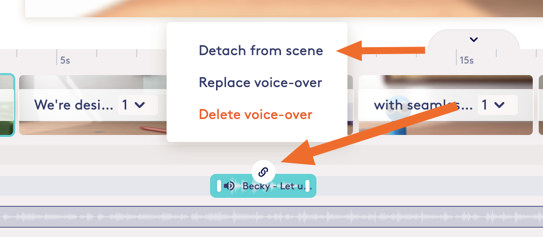
Unpin: select the clip, click its link icon, and choose Detach from scene. The icon changes to an arrow and you can drag the clip anywhere on the timeline.
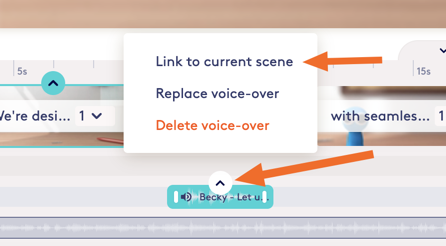
Re-pin: drag the clip on top of a scene, or click the clip’s arrow icon and choose Link to current scene — either way it re-links to that scene.
AI text-to-speech voiceovers
Generate natural-sounding narration from a script with Biteable's text-to-speech AI voices — no recording needed. You can use Biteable's built-in voices or bring a voice from ElevenLabs.
Plan note: text-to-speech is included on Premium and Business plans, and during your free trial. On Pro you'll see an upgrade prompt. (Uploading and recording your own voiceover audio, above, works on every plan.)
Generate an AI voiceover
- In your project, click Voice-over in the content bar (or the microphone icon in the timeline) and open the Text to Speech tab.
- Enter or paste your script. There's a per-clip character limit (about 1,000 characters, roughly 200 words) — split longer narration across multiple clips. The panel also includes built-in translation and an AI text assistant for reworking your script, plus a voice-speed toggle.
- Choose a voice on the Biteable voices tab — click Preview to hear a sample of each.
- Click Generate voiceover, preview the result, then click Add to timeline.
The panel shows how many voice-over clips you have remaining when you approach your generation limit.
Replace or update an AI voiceover
Replacing a text-to-speech clip takes two clicks to finish, and the first click looks like it has already done the job — this is where most people get stuck.
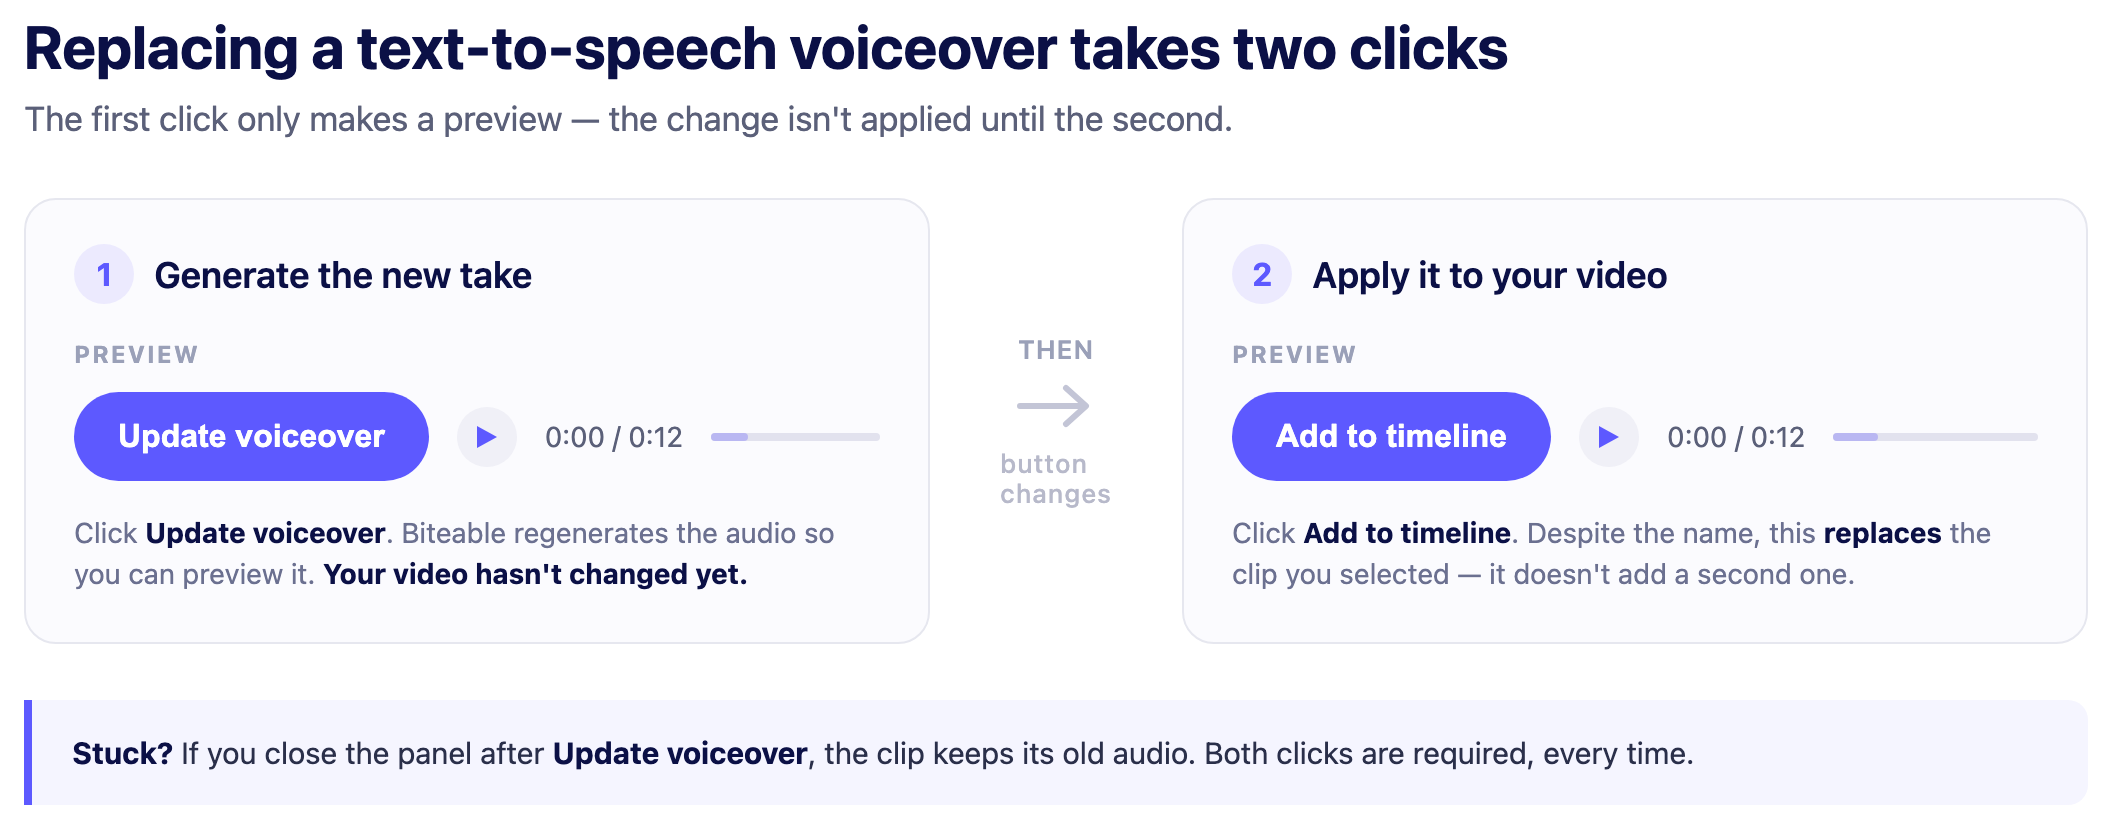
- Click the voiceover clip on the timeline to select it, then click Replace at the bottom of the panel. The Text to Speech panel reopens with that clip's current script and voice.
- Edit the script or choose a different voice.
- Click Update voiceover. This only generates the new take so you can preview it — your video hasn't changed yet. Watch the button: it now changes to Add to timeline.
- Click Add to timeline to apply it. Despite the name, this replaces the clip you selected — it does not add a second one. You'll see the confirmation "Your voice-over has been added to the timeline."
If a replacement doesn't seem to stick: you almost certainly stopped after Update voiceover. That button only regenerates the audio for preview — the clip on your timeline keeps its old audio until you click Add to timeline. Both clicks are required, every time.
Use an ElevenLabs voice
If none of Biteable's built-in voices are right, you can bring in a voice from ElevenLabs' voice library. You'll need a free ElevenLabs account. Only the voice ID crosses over — the audio is still generated in Biteable and counts toward your Biteable voice-over generations.
Keep your own record of any voice ID you want to reuse. Biteable doesn't store ElevenLabs voice IDs — there's no list of voices you've used before, and the field is empty each time you open the panel. You paste the ID in every time you generate a voiceover with that voice, so save the ones you like somewhere you can get at them. The easiest way is to add the voice to My Voices in ElevenLabs, so you can always go back and copy the ID again.
1. Find a voice in ElevenLabs and copy its ID
- Sign in at elevenlabs.io and go to Voices.
-
On the Explore tab, find a voice you like. Search by name or keyword, or narrow the list with the Language and Accent dropdowns and the category chips (Conversational, Narration, Characters, Social Media, Educational). Filters has more options, including gender, age, and quality.
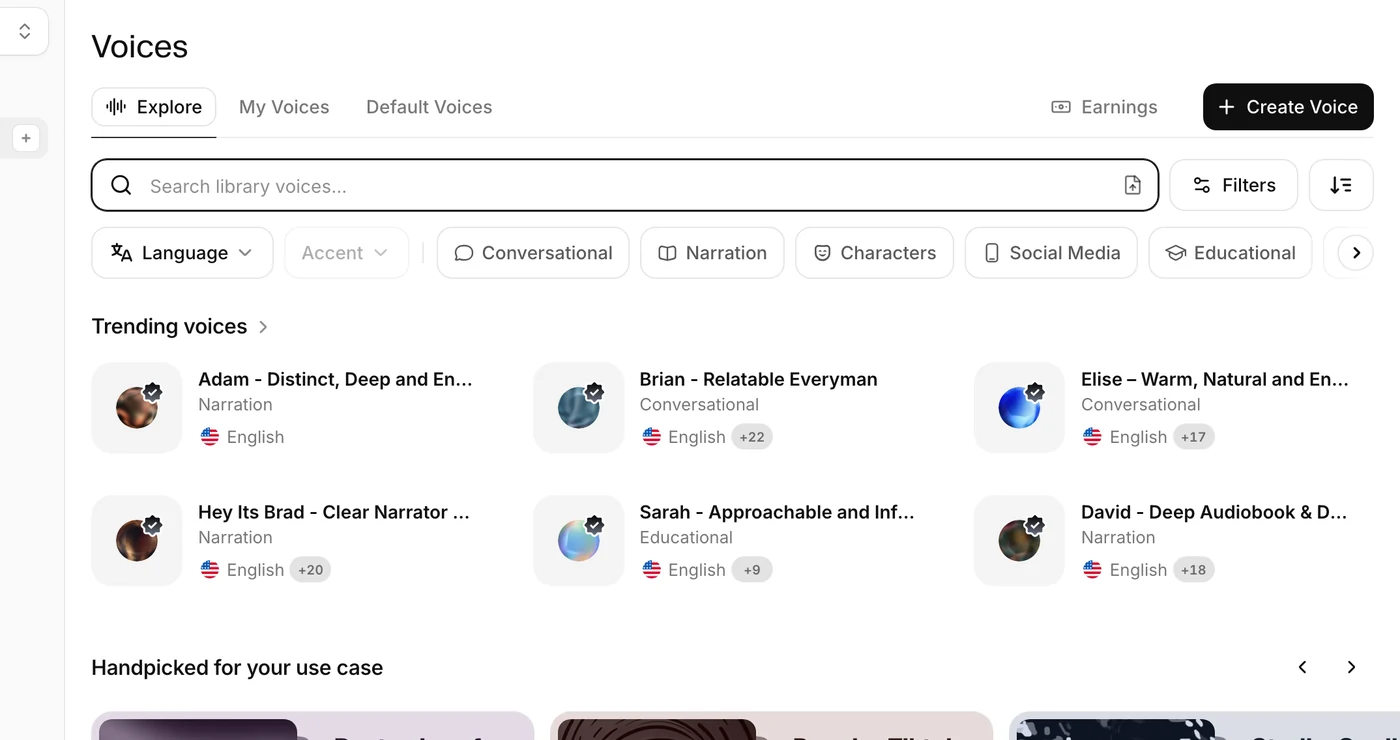
- Click the play button on a voice to hear a sample.
-
On the voice you want, open the More actions menu (the three dots) and choose Copy voice ID. You'll get a short string of letters and numbers, something like
21m00Tcm4TlvDq8ikWAM.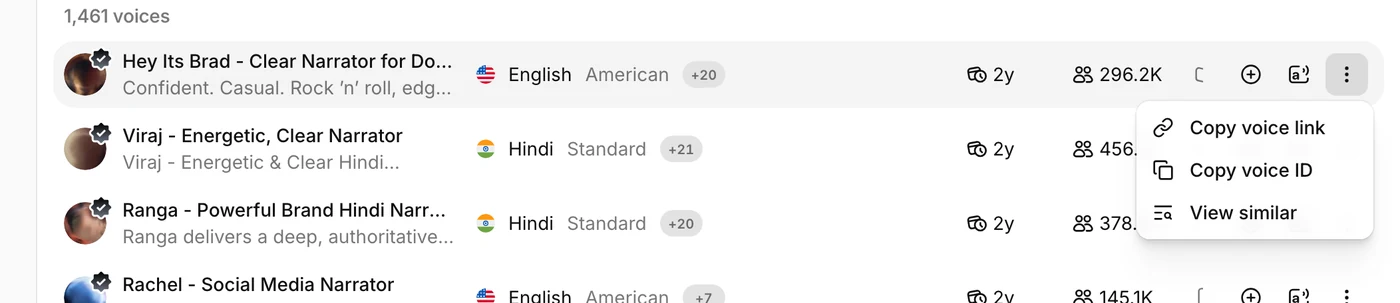
Voices you've created or saved to your account live on the My Voices tab, which has the same Copy voice ID option. You don't need to save a library voice to My Voices first — you can copy the ID straight from Explore — but saving it there makes the ID easy to find again later.
2. Add the voice to your Biteable project
- In your project, open Voice-over → Text to Speech.
- Under choose a voice, click the Add ElevenLabs voice tab.
- Paste the ID into the Paste ElevenLabs Voice ID To Add field.
- Enter your script, click Generate voiceover, preview the result, then click Add to timeline.
The voice is loaded at the moment you generate, so there's no preview of it in Biteable beforehand. To use the same voice on another clip, paste its ID in again.
Not every ElevenLabs voice ID works through the API Biteable uses. An unsupported voice can fail with an error like "there are invalid characters in your script" even when your text is fine. If that happens, use a different voice ID — or generate the audio in ElevenLabs directly, export it, and upload the file to your voiceover timeline.
Customize narration with SSML (Amazon voices only)
Some of Biteable's built-in voices are Amazon-based, and those support SSML tags for fine-tuning narration — pauses, speed, and volume. Type the tags directly into your script.
Most built-in voices are ElevenLabs voices, and they ignore SSML tags. To change the pace of an ElevenLabs voice, use the voice-speed toggle in the Text to Speech panel instead.
Telling them apart: in the voice picker, Amazon voices usually have a coloured or pastel avatar background, and ElevenLabs voices have a white or off-white one. The named list further down is the definitive one — and if you add a tag and it makes no difference to the audio, that voice doesn't support it, so try another.
Add a pause
Use <break/> for a short default pause, or <break time="2s"/> to set a specific length.
Example: Hi there. Welcome to Biteable. <break/> Let's take a deep breath before we get started. <break time="2s"/> Ok. That was nice.
Adjust speed
Wrap text in <prosody rate="…">…</prosody> to change the speaking rate. Options: x-slow, slow, medium, fast, x-fast.
Example: I'll count up fast, then down slowly, <prosody rate="x-slow"> one two three four five </prosody> <prosody rate="x-fast"> five four three two one </prosody>
Adjust volume
Wrap text in <prosody volume="…">…</prosody> to change loudness. Options: silent, x-soft, soft, medium, loud, x-loud.
Example: This is a normal volume. <prosody volume="x-loud"> This is extra loud </prosody> <prosody volume="x-soft"> and this is extra soft </prosody>
Which Amazon voices support which controls
Amazon voices come in four types: Generative (most expressive), Long-Form (most natural for longer content), Neural (natural and human-like), and Standard. Not every control works on every voice:
- Becky (Long-Form): Pause, Speed, Volume
- Ruth (Generative): Pause
- Chelsea (Neural): Pause, Speed, Volume
- Salli (Neural): Pause, Speed, Volume
- Gibson (Generative): Pause
- Stephen (Generative): Pause
- Matthew (Neural): Pause, Speed, Volume
- Joelle (Long-Form): Pause, Speed, Volume
- Danielle (Neural): Pause, Speed, Volume
- Joanna (Generative): Pause
- Gregory (Neural): Pause, Speed, Volume
- Willow (Generative): Pause
- Amy (Neural): Pause, Speed, Volume
- Arthur (Neural): Pause, Speed, Volume
- Emma (Neural): Pause, Speed, Volume
- Brian (Neural): Pause, Speed, Volume
- Leah (Generative): Pause, Speed, Volume
Any built-in voice not on this list is an ElevenLabs voice, so SSML tags won't apply to it.
AI voiceover troubleshooting
- "Whoops, couldn't generate the audio": the Amazon-based voices can't handle certain punctuation — the ampersand (&) is the usual culprit. Replace "&" with "and", or switch to a different voice. If every voice fails, clear your browser cache and hard-refresh.
- A pause/speed/volume tag does nothing: SSML tags only work on the Amazon-based voices, and not every Amazon voice supports every control — see Which Amazon voices support which controls above. On an ElevenLabs voice, use the voice-speed toggle instead.
- The ElevenLabs voice ID field is empty when you come back to it: that's expected — Biteable doesn't keep a record of voice IDs you've used. Paste the ID in again each time you generate.